


Updated: March 28, 2021
How To Create A Custom WordPress Login Page Without A Plugin Or Download A DFY Premade Stylesheet
Table of Contents
Here at ServerWise we’re big believers in site optimization and page load speed above almost everything else. It’s imperative that your website loads quickly for users everywhere on every type of device – not just those on fiber optic high-speed plans, as you most likely are right now.
Each time you install and activate a new plugin, you slow down your page load speed. So, we consider it a best practice to use only as many plugins as you absolutely need.
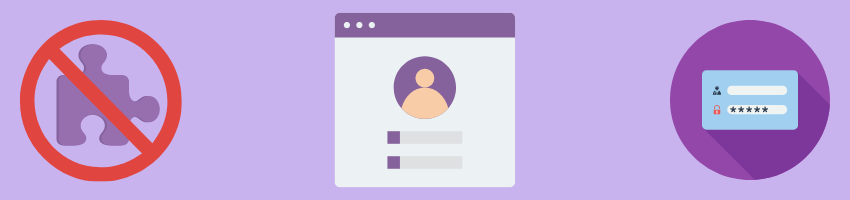
But you’re here because you want a custom WordPress login page without having to install yet another plugin.
Granted, a custom login page can be done quickly with one of several plugins, but you don’t actually need any of those to accomplish this. I’m going to show you a quick way to create a custom login without using a single plugin that would only slow down your site.
Why Should You Create A Custom Login Page?
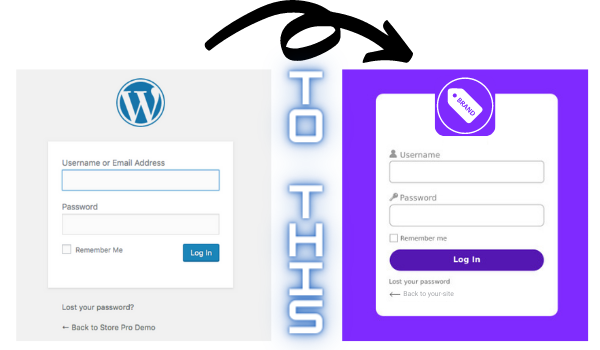
The default WordPress login page hasn’t changed in over a decade. It’s fast, easy on the eyes and automatically responsive. Unfortunately, it’s also boring, lacks your own branding and doesn’t provide that sense of provide that accessing a well-designed page brings.
If you are the only one using your WordPress login page, I suggest you let this go and leave it as is. Sure, it’s dull, but if no one else is seeing it, let it go.
On the other hand, if you have clients, customers or employees logging in frequently, you’ll want a more branded experience for them. Might as well start out their experience on your admin with a fluid, well-designed look that exudes confidence and instills your brand identity.
The Problem With WordPress Customizer Plugins
As I previously stated, I’m not a fan of adding plugins you don’t actually need, and the WordPress login customizer plugins are on my list. In fact, several of those plugins have proven to slow down your site considerably and are just not worth it.
Every additional plugin you install on your WordPress Admin can potentially lead to both security and speed issues, such as:
- A slower overall site due to the plugin’s required JavaScript running in the background unnecessarily.
- Security breaches caused by poor coding or unknown vulnerabilities.
- May require unnecessary background server resources that you’re unaware of until you notice your server CPU running higher than usual.
- Slows down your WordPress Admin speed.
- Lack of timely updates that may cause the plugin to fail at the next major WordPress update
- A plugin that may not play nice with other, more important, plugins your site requires.
The Basic Outline Of Customizing Your Login Page
In short, here’s everything we’re going to change in this tutorial:
- Add your own logo.
- Add a custom background.
- Remove the “Back to ___” link.
- Remove the lost password link.
- Customize the overall login form appearance.
- Modify the submit button appearance.
- Stop the login page shake.
- Hide the login error messages.
- Set the “Remember Me” option to checked by default.
- Change the login logo link URL.
- Add curved corners and a light-drop shadow to the login box.
- Putting it all together with a custom CSS stylesheet for the new login page.
Let's Get Started Creating Your Custom WordPress Login Page
Our kind-hearted clients at HopeTotes.org, which is a wonderful Austin, TX charity dedicated to helping children in foster care, has graciously allowed me to use their login page as an example for this tutorial.
Step 1: Create a new login directory.
To get started, you will need access to your site directory either via FTP or through your Control Panel.
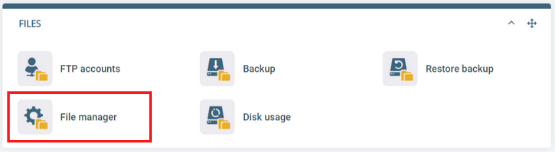
All control panels including cPanel and Plesk provide this direct to your site. But for this tutorial, I’m going to use the ServerWise Host Panel.
In your ServerWise Host Panel dashboard, pull down to the Files section and click on File manager.
Access your site and go into your theme directory.
Create a folder called login. You may call it anything you like, but login keeps it easy for future reference.
I have noticed that some themes refuse to recognize the new login folder. If that happens to you, just create the folder in your site’s root directory.
I also created an additional folder in the uploads directory called images. This is where I’ll put the new login background image and logo.
Step 2: Create your new login stylesheet (or grab one of my code templates below).
Next, in that new login folder, create a new CSS file called custom-login.css, again you can call it whatever you want just remember it for later.
You’re actually going to select to create a TXT file, but you’ll put .css on the end when you save it, which will convert it to a stylesheet file.
Now before we start creating a new style, making some color choices and adding in our background we’re going to have to tell WordPress that the new stylesheet exists.
Step 3: Add the new stylesheet to functions.php.
So we have the new stylesheet created (it’s still empty, of course) but WordPress doesn’t yet know the new stylesheet exists. We have to tell WordPress where to find the new stylesheet and to call it up.
To do this, we have to add some code to the functions.php file; found in wp-includes directory. I strongly suggest you back up your functions.php just in case – always a good idea.
Here’s the code we need to add to functions.php. In my example, the stylesheet is called custom-login.css. Remember to change the name of the stylesheet if required.
					function my_custom_login()
{
echo '<link rel="stylesheet" type="text/css" href="' . get_bloginfo('stylesheet_directory') . '/login/custom-login.css" />';
}
add_action('login_head', 'my_custom_login');
This code tells WordPress to load the style sheet you created onto the WordPress login page.
Please remember if the location of the folder or the name of the CSS file is different, you will need to replace the path on line 3 accordingly. My code assumes you have placed the new login folder inside your theme’s directory.
Step 4: Replace the WordPress logo.
First things first, we need to replace the WordPress logo.
I suggest you select a logo in PNG format, preferably with a transparent background for flexibility.
My code snippet below assumes you saved your custom logo to the images folder that we created in Step 1.
#login h1 a {
background-image: url("/wp-content/uploads/images/login-logo.png");
background-size:100px;
height:100px;
width:100px;}
Step 5: Add your custom background.
With the CSS code below, you can add any image to your new custom WordPress login page. I recommend using a high-resolution image that has been optimized and saved in PNG or WEBP format. Ideally, the background image should be at least 1920 x 1080 in size so that it won’t get blurry when it scales for bigger screens.
Remember to specify the correct name and path to your background image in the CSS code below.
Body.login
{
background-image:url("/wp-content/uploads/images/custom-login-bg.png");
background-repeat:no-repeat;
background-attachment:fixed;
background-position:center;
}
Step 6: Remove the "Back to" link.
The “Back to…” link takes users to your homepage. If you want a more clean look, you can remove it with the code below.
p#backtoblog a {
display: none; !important;
}
Step 7: Remove the "Lost password" link.
Unless you’re running a membership site through your WordPress Admin, you probably don’t need the “Lost password” utility. And keep in mind, this is often the first way hackers will try to access your site. I recommend removing it entirely with the following code.
p#nav
{
display: none;
}
Step 8: Customize the overall login form appearance.
Now that we have the most obvious customization issues handled (logo, background, and removing unnecessary links) let’s put together our custom form itself.
Below is the code I’m using in this example. You can easily change it to meet your customization needs.
.login form{
box-shadow:none;
padding:20px;
}
#login {
background: #FFF;
margin: 50px auto;
padding: 40px 20px;
width: 400px;
}
.login label {
color: #555;
font-size: 14px;
}
.login form .forgetmenot{
float:none;
}
Step 9: Modify the submit button appearance.
What’s a custom page and custom login form without a custom submit button? You can alter the look of the button itself by adding the following code to the custom-login.css file.
#login form p.submit{
margin-top:15px;
}
.login.wp-core-ui .button-primary {
background: #7F33A8;
border-color:#7F33A8;
box-shadow: 0 1px 0 #7F33A8;
color: #FFF;
text-shadow: none;
float: none;
clear: both;
display: block;
width: 100%;
padding: 7px;
height: auto;
font-size: 15px;
}
Step 10: Stop the login page shake.
As you probably know, when a user submits the wrong login information, the form shakes. It’s done this for over ten years for no reason. You can easily remove it with the following code.
function custom_login_head() {
remove_action('login_head', 'wp_shake_js', 12);
}
add_action('login_head', 'custom_login_head');
Step 11: Hide the login error messages.
While at first glance, this feature may seem helpful. After all, it’s a useful message as it lets your user know what he or she did wrong. Unfortunately, these messages can also be used by hackers to crack user login credentials and gain access to your site.
I consider it a WordPress security best practice to simply remove them entirely with the code below, which must be added to your functions.php and NOT your stylesheet.
function custom_login_error_message()
{
return 'Please enter valid login credentials.';
}
add_filter('login_errors', 'custom_login_error_message');
Step 12: Set the "Remember Me" option to checked by default.
The “Remember Me” box is unchecked by default by WordPress, but with the following code you can change that.
add_filter( 'login_footer', 'default_rememberme_checked' );
}
add_action( 'init', 'default_checked_remember_me' );
function default_rememberme_checked() {
echo "<script>document.getElementById('rememberme').checked = true;</script>";
}
Step 13: Change the login logo link URL.
You replaced the WordPress logo with your own, but the link itself still goes to wordpress.org by default.
We need to redirect that link elsewhere. In the following example, I set the link to redirect to the HopeTotes.org homepage. Simply replace with your own URL.
function custom_login_logo_url() {
return get_bloginfo( 'url' );
}
add_filter( 'login_headerurl', 'custom_login_logo_url' );

function custom_login_logo_url_title() {
return 'Default Site Title';
}
add_filter( 'login_headertitle', 'custom_login_logo_url_title' );
Step 14: Add curved corners and a light-drop shadow to the login box.
You may want to get rid of the sharp box corners of the WordPress login box and replace them with modern, softer curved corners.
This is easy in your login stylesheet. Use the code below and replace the color hex with any color you prefer. You can increase the curve of the corners by increasing the percentage, which I have set to 10% for a little curve.
#loginform {border-radius:10px;
	box-shadow: 0 0 12px #777777;}
Step 15: Putting it all together.
Now that I’ve broken down each major step along the way to a custom WordPress login page, it’s time to put it all together.
Here’s our example CSS code that you’ll want to copy and paste (and customize) into your custom-login.css file.
Body.login
{ background-image:url("/wp-content/uploads/custom-login-bg.jpg");
background-repeat:no-repeat;
background-attachment:fixed;
background-position:center; }

.login h1 a { background-image: url(‘/wp-content/uploads/login-logo.png');
background-size:100px !important;
height:100px;
width:100px !important; }

p#backtoblog a {
display: none; !important;
}

p#nav { display: none; }

.login form{ box-shadow:none;
padding:20px; }

#login { background: #FFF;
margin: 50px auto;
padding: 40px 20px;
width: 400px; }

.login label { color: #555;
font-size: 14px; }

.login form .forgetmenot{ float:none; }

#login form p.submit{ margin-top:15px; }

.login.wp-core-ui .button-primary {
background: #7F33A8;
border-color:#7F33A8;
box-shadow: 0 1px 0 #7F33A8;
color: #FFF;
text-shadow: none;
float: none;
clear: both;
display: block;
width: 100%;
padding: 7px;
height: auto;
font-size: 15px; }

#loginform { border-radius:10px;
box-shadow: 0 0 12px #767676; }
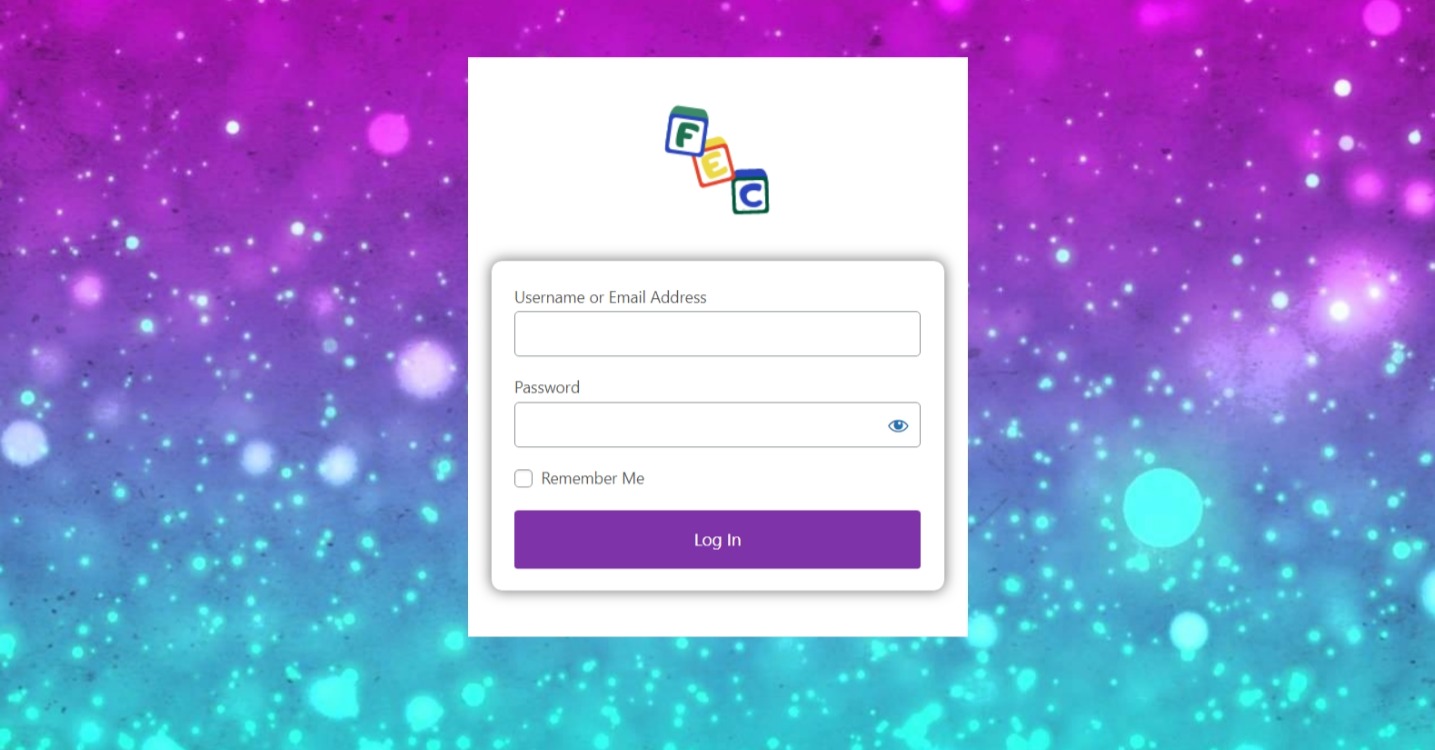
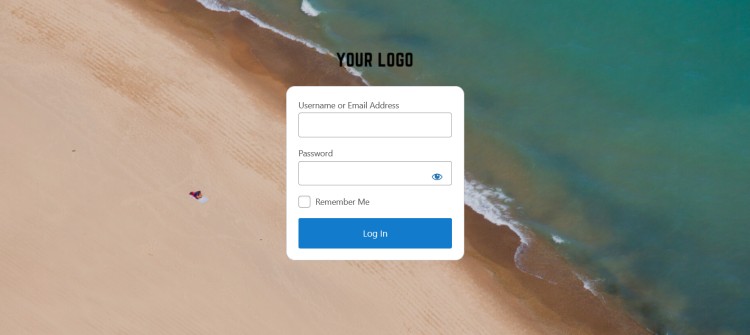
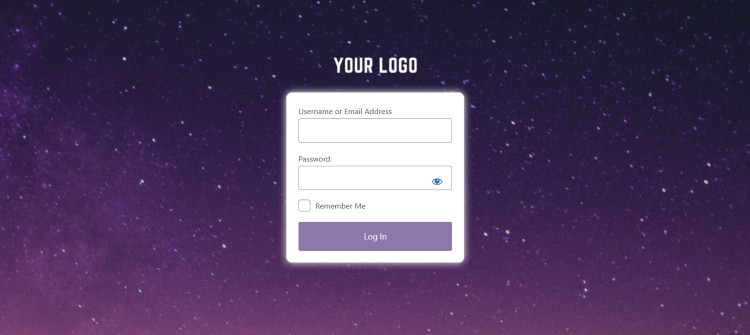
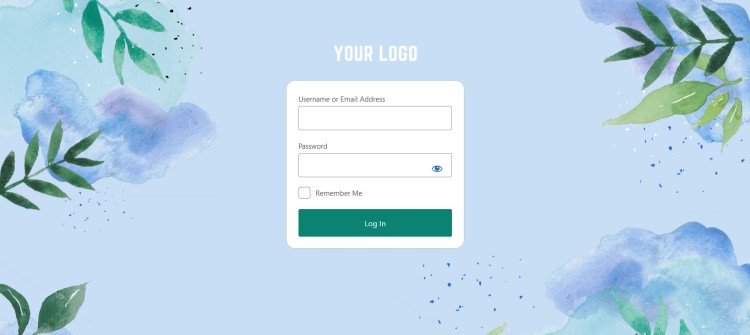
The code above when pasted into custom-login.css stylesheet and uploaded created the following for our client, For Every Child.
Downloadable WordPress Login CSS Templates
In an effort to make this whole experience easier on you and to prove that you don’t need a plugin for everything, I’ve put together a few WordPress Login CSS files for your convenience.
If you choose to use one of my pre-made CSS designs, remember you still must add the necessary code in functions.php before uploading the stylesheet.
Right click on any theme screenshot you’re interested in and select Save As. I’ve zipped each into a zip file with the accompanying background included.


And there you have it. You now have no reason to keep that unoptimized and unnecessary login customizer plugin.
You can use my code above as a helpful guideline if you decide to start from scratch.
Or feel free to save yourself some time and download one of my pre-made stylesheets and backgrounds. I did the work, so you don’t have to, might as well use them.
As always, if you’re a ServerWise client… why are you reading this article? Open a ticket, and we’ll get your custom WordPress Login page handled for you.


Divi and Elementor are popular WordPress visual page builder plugins for a reason, but which is best for your needs? Let’s examine the similarities, differences, strengths, weaknesses and pricing to answer that question. Keep Learning >

We tested Smush Pro CDN, WPMU DEV and Bunny.net and switched to Bunny CDN with no regrets. Faster, flexible, no WordPress plugin required and cheaper. Let me explain. Keep Learning >