


Updated: March 14, 2021
7 WordPress Settings Every New WordPress User Must Know
WordPress powers over 40% of all websites, including some huge names like CNN and even the Microsoft Blog. The open-source content powerhouse is flexible, easy to use and newbie friendly, but there are a handful of settings you need to configure properly right away. You get these settings handled in the beginning, and you’ll have a more pleasant WordPress experience building an amazing website.
Maybe you already know these settings, in which case, feel free to head over to one of my other articles. I’m not out to waste your time, so here are settings I’m going to discuss in this article:
- Site Title and Tagline
- Administration Email Address
- Membership
- New User Default Role
- Your Homepage and Blog Display Options
- Search Engine Visibility
- Permalinks
To get started we log into our WordPress website dashboard and scroll down to Settings where we start with General which should look like this:
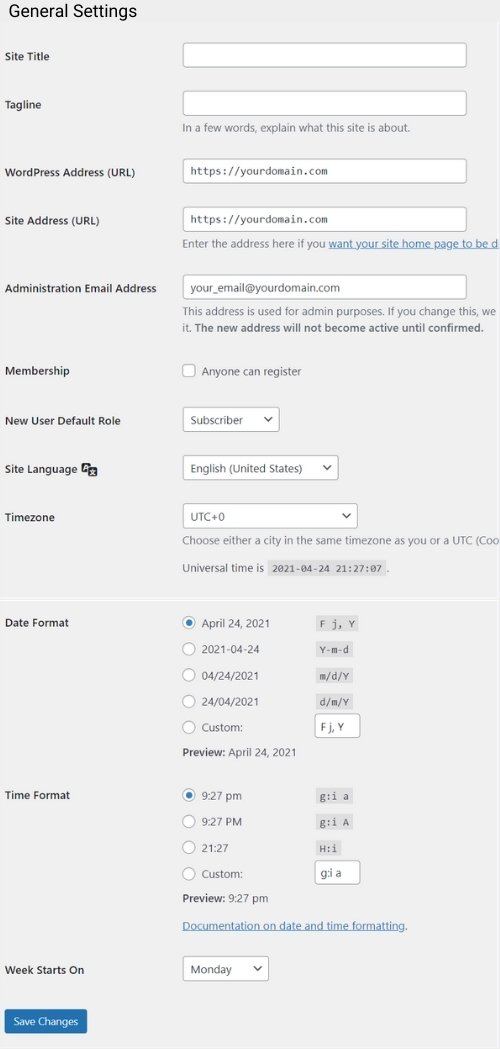
Site Title and Tagline
The first thing you’ll want to configure is your site title and tagline.
Back on your WordPress website when you hover over the tab in the browser, you’ll notice that it says “personal blog – just another WordPress website.”
By default, WordPress gives your fresh install the Site Title of “personal blog” and the Tagline of “just another WordPress website”.
Obviously that’s rather unprofessional, you’ll need to change it right away.
The Site Title should be your business name or your own name (if you are your brand identity like a coach, lawyer or copywriter). Enter just the name of your company or business as the site title in this box.
For your site’s tagline, you can explain what your WordPress website is about, you can use keywords, or you can leave it blank.
Regardless of your choice, please do not leave the default “just another WordPress site.” You want to make your website as professional as possible, so a branded motto, keywords used as a tagline or simple succinct goal is preferable. Choose something short but poignant that tells your site visitors exactly what your WordPress site is all about.
Here are some examples of a working site title and tagline:
Site Title
Dr. Peter Banning
Peter Banning
Banning & Sons
Banning Inc.
Tagline
Marketing Consultant
Financial and Success Coach
Chicago’s Best Plumbers
Putting Earth First Since 1978
Administration Email Address
The admin email address is the email where you will receive information about your WordPress website. This was set up when you first created your WordPress website.
As we’re already on the General Settings page in our WordPress Admin, simply scroll down to Administration Email Address.
It is particularly important that you keep this email address updated, as this is how your WordPress site will communicate with you in the event of an issue.
If you need to change this email address, just enter the new address into the box and click on Save Changes at the bottom. WordPress requires confirmation, so be sure to check your email and click on the link to confirm the changes.
Membership
The next setting is called Membership. This is where you establish your initial relationship with your site users.
Are you going to allow users to register on your site?
If to post comments, interact or otherwise engage with your site you’re going to require a visitor joins your WordPress site, check the box to allow users to register.
This setting is especially beneficial if you plan on turning your WordPress site into a membership website or intend to provide private content to subscribers only. Selecting this option will automatically add a registration form to your site. It can be a valuable marketing tool if used correctly.
Most WordPress users leave this box unchecked. You can also add the Membership requirement later by returning to the General Settings page and checking the box.
New User Default Role
The new user default role allows you to determine what level of access your new users will have on your WordPress website.
This setting appears directly in the membership setting. The default role for a new user is Subscriber.
User Roles Defined (listed from least to most access)
Subscribers can edit their profiles and leave comments on your website, but not much else.
Contributors can write and save posts, but not publish them.
Authors can do everything subscribers and contributors can do, but they can also write, save and publish posts.
Editors can both write and publish posts, as well as edit and publish posts by other authors. This is the access you would grant to the person who is in charge of your content marketing strategy or oversees your blog.
Administrators have complete and unrestricted access to your WordPress Admin. An Admin can do anything and everything, including deleting your entire blog, so I suggest you keep admin access to yourself.
The default setting of subscriber is typically the best setting for most WordPress users. And always limit administrator access to your WordPress website to only business partners or those you trust completely.
Once you have made all the changes above, scroll to the bottom of the General Settings and click Save Settings.
Homepage and Blog Display Options
This setting is critical and is often where many new WordPress users get stuck.
How do you get your homepage to display on the actual homepage?
How do you set your blog posts to appear on the blog page?
To accomplish this step, we need to leave the General Settings and go to Reading. On the left-hand side of the Admin menu under Settings, click on Reading (directly under Writing). Here we can set your homepage and blog posts page.
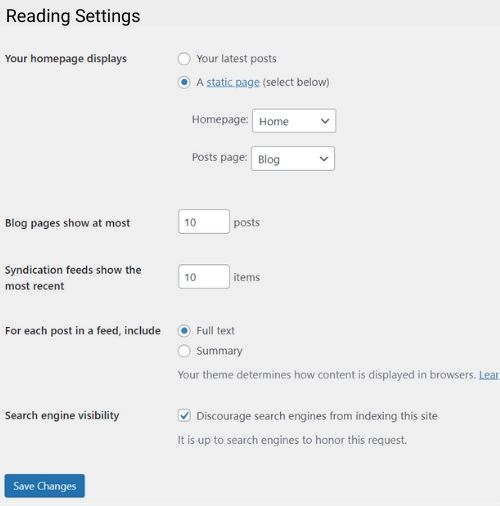
At the very top, it says your Home page displays. Now there are a couple options here:
The first option is to choose your latest posts. If you select Your Latest Posts and click on Save Changes, your homepage will now show your blog posts. Essentially, this transforms your homepage into the front page of a blog.
The second and more popular option is to select a separate home page from your blog posts page.
WordPress makes this easy. Simply choose A static page and, using the drop-down boxes, you’ll select which page is to be your homepage and which will serve up your blog posts.
The home page or posts page you select here can be any page in your WordPress site. The home page doesn’t even need to be named Home.
You may need to create a blank Blog page to serve up your posts. It’s easy. Follow these quick steps:
Click on New in the WordPress Admin Bar at the top of the page and select Page. Name the page Blog and click Publish (you may need to click Publish again). Now, your blog posts will autopopulate that blank Blog page you just created.
After you select your pages to serve as your WordPress website home page and posts page, remember to click Save Changes.
Search Engine Visibility
This setting is one of the most forgotten and overlooked WordPress setting, yet it’s arguably one of the most important.
One way to ensure that your WordPress website is found in search is to make sure that your WordPress setting is configured properly for search engine visibility.
On the Reading Settings screen, you’ll want to scroll down just before the Save Changes button. There you’ll see Search engine visibility with a checkbox that reads “Discourage search engines from indexing this site”.
In order to allow search engines to crawl and index your site, you will want to make sure that you leave this box unchecked.
Now, if your site is presently under construction, leave this box checked until you are ready to go public. Once you go live, you will need to come back to this setting and uncheck this box so that your website can be discovered by Google and Bing.
Click on Save Changes.
Permalinks
The last setting that we are going to cover today is permalinks.
This is another important setting, and it’s best to set this properly right away because once your website is live, and you have several post and pages, this will not be an easy setting to change.
A permalink is the friendly URL to every page and blog post on your website. Let’s say you have a blog post titled “What You Need To Know When Transferring Out Of State”.
The permalink is what decides how that blog post will appear in a browser. Essentially, it’s the difference between:
https://www.yourdomain.com/?p=589456
OR
https://www.yourdomain.com/transfer-out-of-state
You want the URL to the post to be easy to remember and recognize. After all, when this post pops up in a Google search, are you more liked to click on the first URL or the second?
So, to change permalinks, you click on Permalinks under Settings.
Now you’ll see here that the default setting is Plain, and that means each post or page will start with a question mark and a P followed by the number of the post itself. This isn’t an attractive or confidence-inducing URL, so don’t choose it.
Now to change that so the title of your post will be served in the URL, you’ll choose Post name.
Click on Save Changes.
That’s all there is to it. No need to complicate matters, but if you find yourself overwhelmed setting up your first WordPress site, reach out, and we’ll help.


Divi and Elementor are popular WordPress visual page builder plugins for a reason, but which is best for your needs? Let’s examine the similarities, differences, strengths, weaknesses and pricing to answer that question. Keep Learning >

We tested Smush Pro CDN, WPMU DEV and Bunny.net and switched to Bunny CDN with no regrets. Faster, flexible, no WordPress plugin required and cheaper. Let me explain. Keep Learning >