


Updated: May 2, 2021
How To Fix Your WordPress Site After A Plugin Update Goes Terribly Wrong; Fast Fix First
Table of Contents
Since the addition of the WordPress auto update feature, many have experienced a few glitches here and there. And those were the lucky ones. But some of us have had to deal with a plugin update that broke the entire site, and our profanity went from casual to constant.
This happens several ways. It can happen to an outdated legacy plugin when WordPress updates itself. Or it can happen when a developer failed to update the plugin in time, meaning it’s not fully compatible.
Most of the time, these updates run without a hitch. Those of us who remember the early days of WordPress and plugin usage feel this is a remarkable parade-worthy feat worthy. But now we’re spoiled. Now we expect every WordPress update to execute flawlessly, and we rarely consider the many developers who must scurry to update their plugins in time.
So, the update went wrong, and now you’re facing a stark white screen. Don’t panic because I’m going to show you exactly how to troubleshoot and fix problems caused by WordPress and plugin updates. We’re going to cover how to get your site up fast, and then we’ll focus on finding the problem and repairing it.
First Get Your WordPress Site Back Up ASAP
The ideal thing to do is diagnose what caused the failure and fix it. But let’s be realistic. Your site is down, and you don’t have time to investigate the cause. You just need the site back online immediately.
So first, we’re going to focus on getting your site back up and running quickly. Once we do that, we’ll move to the diagnosis and repair step.
3 Ways To Get Your Site Back Online In An Emergency
1. Restore Your Site from a Backup
You can restore your site from the most recent backup if you have automated backups running. Many business-class hosts provide fully automated, off-site backups of your website and database. Log into your hosting control panel and go to your backups and hit Restore. It’s that easy.
For your convenience, you’ll find quick directions and screenshots from the two most popular hosting control panels, as well as our own hosting panel below.
Restore Your Site Using CPanel
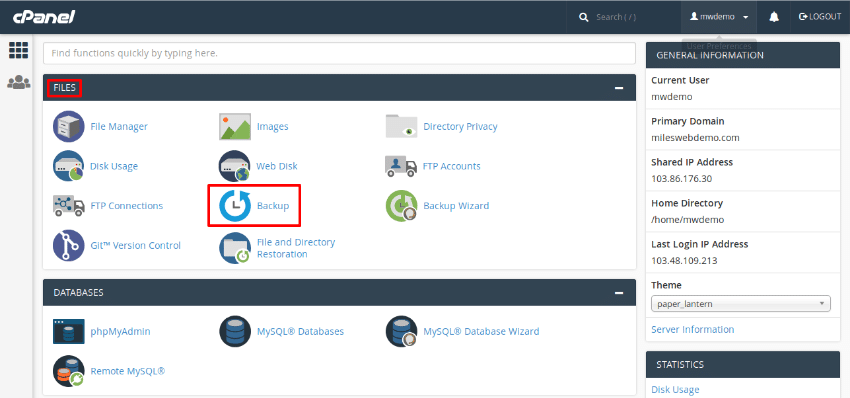
To restore using cPanel, follow these steps:
- Once logged into your cPanel click on Backup in your dashboard.
- This will open the Backup Wizard.
Select your restore type. To restore your entire site, you’ll choose Home Directory. Or select MySQL Databases to restore your WordPress database only.
- Select your host-provided automated backup, or choose to upload your backup file from your computer.
- Hit Restore. The process may take some time, depending on the size of your site and database.
Restore Your Site Using Plesk
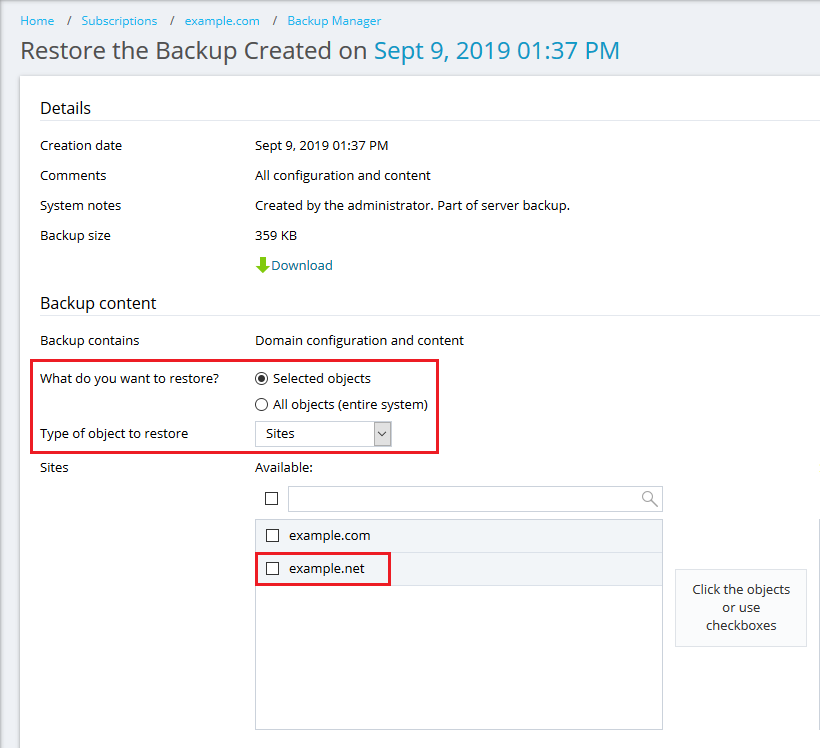
Note: You can only restore backups made in Plesk Onyx 17.0 and later.
- Log into your Plesk Control Panel and go to Websites & Domains and click on Backup Manager.
- Here, you can choose which stored or remote backup you wish to use.
- Select the backup, check your configurations and click Restore.
Restore Your Site Using ServerWise
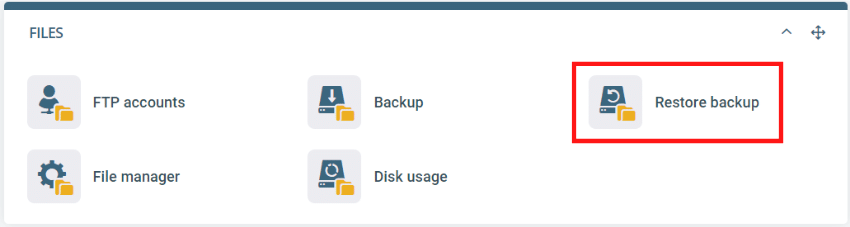
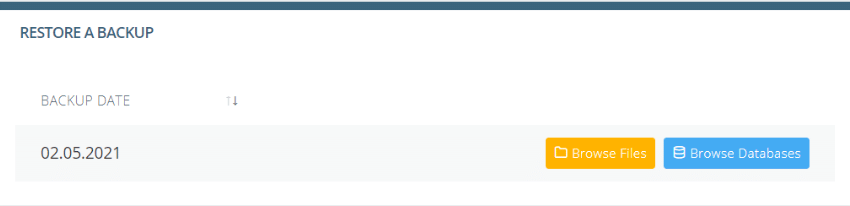
On the Restore A Backup screen you can select Browse Files (to restore one, many or the entire site). In the Files & Folders screen, you need only select your domain and click Restore. You can also restore individual files or entire folders.
To restore only your WordPress database, click Browse Databases, select the version you wish to restore and confirm your selection.
Your site will restore itself within a few minutes.
ServerWise automatically backs up your site(s) including all data, files, images and emails daily. You do not have to turn on this service as it is automatically applied on all domains and accounts and cannot be disabled. The backups are maintained off-site and available 24/7.
2. Restore Using a Backup Plugin
What if you can’t access the WordPress admin panel to restore from your backup plugin?
Nothing to worry about. All decent backup plug-ins provide a way around this, so head over to their documentation and click on the area relating to restoring WordPress without WP Admin access.
3. Down & Dirty FTP Method To Restore Your Site
So as not to mislead anyone – this does not always work. In my personal experience, it has a 65% success rate. If you don’t have a backup of your site, the down and dirty FTP method of restoration is your next step.
The Step-By-Step FTP Method:
- Connect to your site via FTP using Filezilla or another FTP client.
- Navigate to your wp-content folder under your WordPress install.
- Rename the entire plugins folders to plugins_123 (any name will do). You can do this in your FTP client by right-clicking on the plugins folders and selecting Rename.
- You have now successfully disabled all of your plugins by making them vanish from WordPress. Now you have a bare box WordPress site.
- Log into your WordPress Admin which you should have access to again.
- Once you verify that your site is online, and you can access your WordPress Admin, you can begin to identify the exact plugin that caused the disruption.
Identify The Problem That Caused Your WordPress To Fail
At this point, your WordPress site should be back online and operational (for the most part). But this didn’t solve the problem. In truth, the issue with the bad plugin is waiting to happen again once you update the culprit (if using a restored backup) or reactivate it (if you used the FTP renaming method).
So now we must identify the actual problem. Luckily you have options, so choose the one you are most comfortable with and let’s get to it.
Here are your options:
1. Use a WordPress plugin to identify the problem.
2. Check the support forum on WordPress.org for each of your plugins.
3. Rename each plugin one-by-one using FTP until you know the bad player.
Use a WordPress Plugin To Identify The Problem
While I prefer using options two and three, many WordPress users prefer to use a specialty plugin to do the work. Oftentimes, it will get the job done just remember to delete it afterward.
My personal recommendation and the only plugin I’ve ever used to identify issues. The best feature of this free plugin is that it can be used even when you can’t access your WordPress Admin.
The white screen of death – that fatal error all WordPress admins dread means nothing to Plugin Detective.
Simply upload the plugin to your site via FTP and type in the following URL (replace the domain with your own):
yoursite.com/wp-content/plugins/plugin-detective/troubleshoot
Keep in mind that if you changed the name of the plugins folder, you will want to change it back AFTER disabling each plugin by using the same renaming trick that you used to disable the folder itself.
In order for Plugin Detective to do its job, you will need to reactivate the plugins. My suggestion is to wait until you can afford maintenance downtime (11pm or 1am).
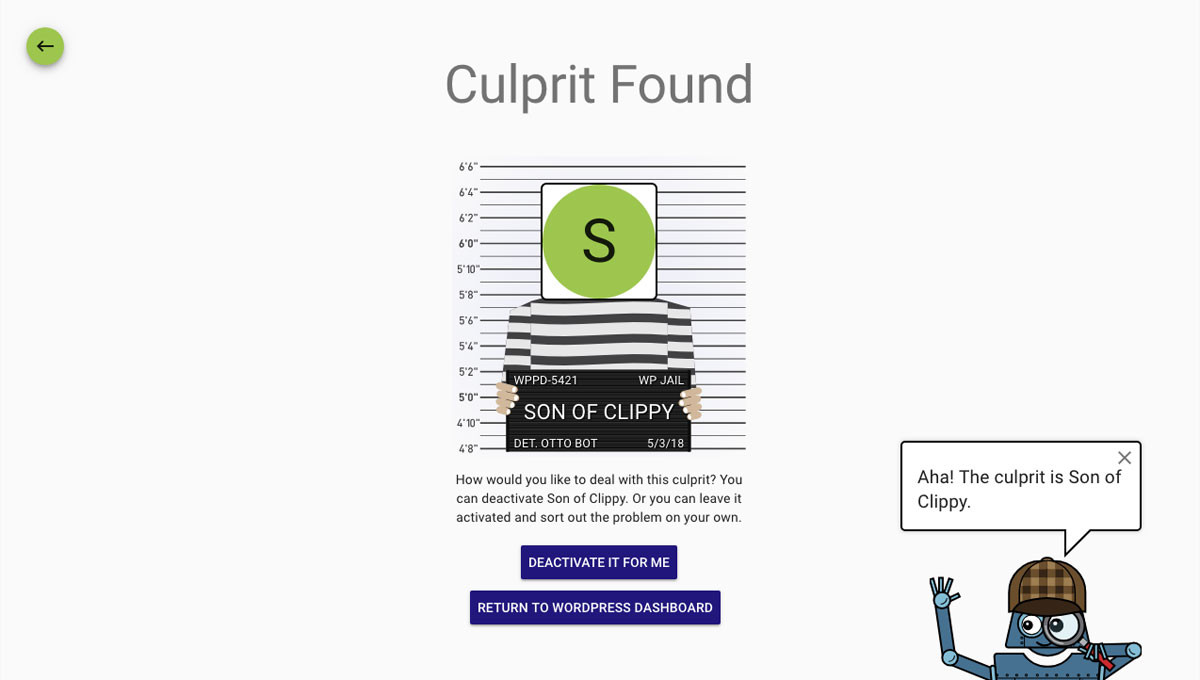
If you restored from a backup, you can simply allow Plugin Detective to get to work. Once it identifies the culprit, you can disable the plugin and contact the developer or replace it with an updated alternative.
Find Out If Your Theme Is The Problem
Now you may suspect that your theme is the problem. At the very least, you may want to rule it out in your process of elimination. The easiest way to determine whether your theme is the issue is to temporarily activate the most recent default WordPress theme.
In your WordPress Admin, click on Appearance and Themes and choose the default general theme. If the problem is solved, you now know your theme is the culprit, and you’ll need to contact the theme’s developer for a fix.
On the other hand, if you switch themes and the problem is still there, you’ve successfully eliminated your theme from the list of suspects.
Switch to Debug Mode Even For The White Screen of Death
One other tip for narrowing down problems, especially if you have a white screen of death is to put your site in debug mode.
This is a bit more advanced. You will need access to your server through FTP or your file manager in your hosting control panel (cPanel, Plesk or ServerWise Hosting Panel)
When in debug mode, WordPress will display error messages on the browser page, allowing you some insight into the root cause of the disruption.
The code that is output to your browser may not make much sense to you, but try and look for a plugin name. If you see a plugin named in the code (even if you don’t understand the code itself), it’s a safe bet that by renaming or even deleting that plugin will fix the problem.
Using your control panel (or FTP) find the wp-config.php file in your WordPress installation directory.
Open it so you can edit the file. Look for the following line:
define('WP_DEBUG', false); This is as easy as changing the “false” to “true”, so it looks like the following:
define('WP_DEBUG', true); Save the wp-config.php file and head over to your WordPress URL and start scanning for plugin names until you find the troublemaker.
Remember to switch debug mode back off when you no longer need it. Keeping it on will become a security risk and could allow hackers to more easily access your WordPress site. Another strong reason to wait and debug your site in the middle of the night.
Tips For Plugin Update Nightmares
1. Once you identify the problematic plugin, theme or element, either remove it and contact the developer or rename via FTP to prevent a recurrence.
2. If the problem is widespread and associated with a required WordPress update (it has happened) you can use WP Rollback or WP Downgrade to take control of what versions are activated. Select versions you know play nice with one another and lock your WP site to those versions until the problem is fixed.
3. If nothing else works, including Plugin Detective and renaming the plugins folder via FTP, it may be a server memory issue. Contact your host and ask that your PHP memory be increased.
4. If you are not a ServerWise client, you may not have automated backups at your fingertips. In that case, always make sure you keep at least one full backup of your WordPress site. I recommend maintaining a backup file on your computer and a copy in Google Drive.
In closing, updates going wrong can be stressful and even panic-inducing, but problems like this are less likely to happen if you keep on top of weekly updates.
When it does occur, it’s usually a relatively easy fix, so pause, take a deep breath and work through the steps that I’ve covered.
If you are a ServerWise client, all WordPress updates are handled by your Sites Manager. Each is tested in a staging environment for compatibility before your site is updated.


Everyone who is selling something could use a strong info-product to compliment their brand and boost engagement. Whether you charge for it upfront or not is irrelevant. I’ve put together my 18 step cheat sheet for creating awesome products. Keep Learning >

Divi and Elementor are popular WordPress visual page builder plugins for a reason, but which is best for your needs? Let’s examine the similarities, differences, strengths, weaknesses and pricing to answer that question. Keep Learning >